Looking for a fresh and flavorful dish that’s easy to make? Try my creamy pesto chicken salad! With tender chicken, zesty basil pesto, and crunchy veggies, this salad is a burst of flavor in every bite. Plus, it comes together quickly, making it perfect for meal prep or a light lunch. Join me as I walk you through the simple steps to create this delicious dish that everyone will love!
Why I Love This Recipe
- Quick and Easy: This recipe comes together in just 20 minutes, making it perfect for a busy weeknight dinner or a last-minute lunch.
- Flavorful Twist: The combination of creamy mayonnaise and vibrant basil pesto gives this chicken salad a deliciously unique flavor that elevates it beyond traditional recipes.
- Nutritious and Filling: With high protein from the chicken and healthy fats from the nuts, this salad is not only satisfying but also packed with nutrients.
- Versatile Serving Options: Whether served in a bowl, on a sandwich, or in a wrap, this salad can be enjoyed in many ways to suit your preferences.
Ingredients
Main Ingredients
– 2 cups cooked chicken breast, shredded
– 1 cup mayonnaise
– 1/2 cup basil pesto
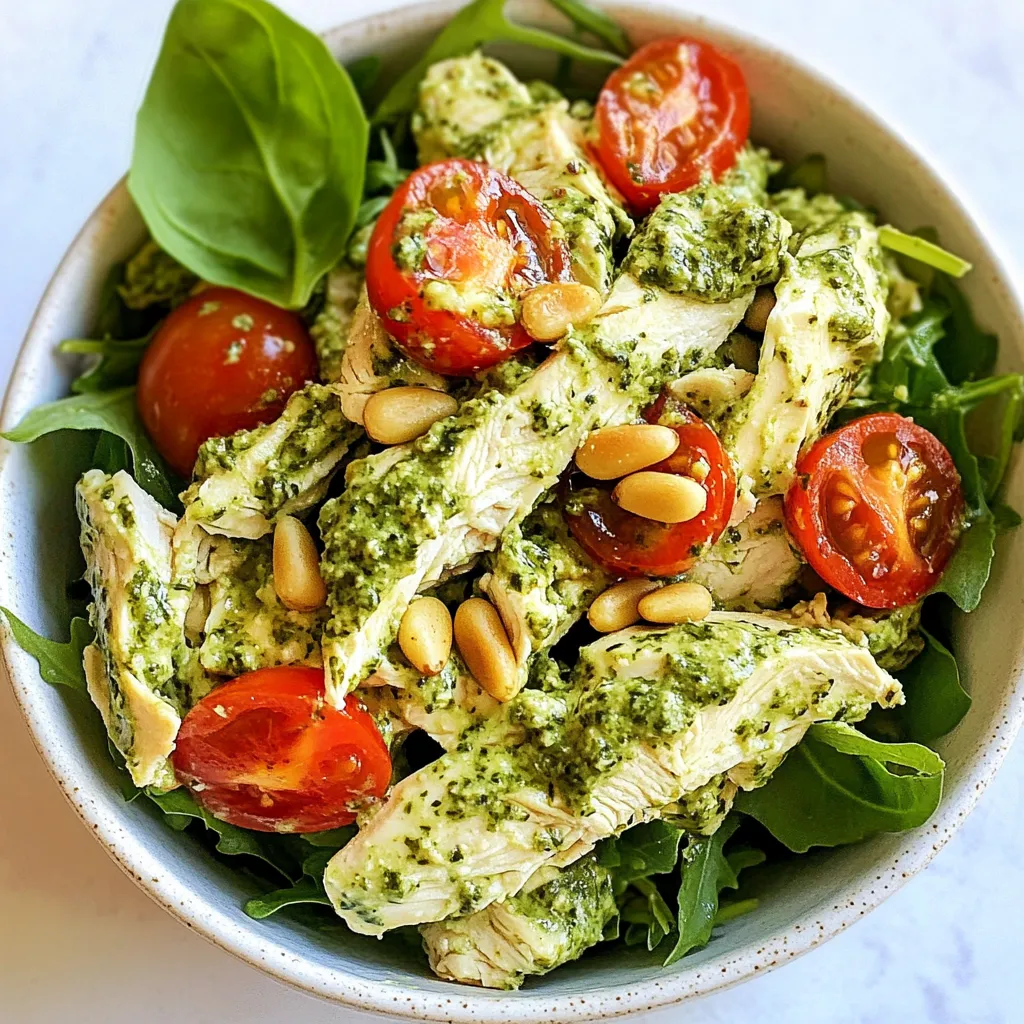
The main ingredients form the heart of the creamy pesto chicken salad. The cooked chicken breast brings protein and substance, making this dish filling. I like using shredded chicken for a tender texture. Mayonnaise adds creaminess and binds everything together. Basil pesto brings rich flavor with a hint of freshness. This mix sets the stage for a vibrant salad.
Additional Ingredients
– 1/2 cup cherry tomatoes, halved
– 1/4 cup red onion, finely chopped
– 1/4 cup toasted pine nuts
Cherry tomatoes add a burst of sweetness and color. They brighten each bite. Finely chopped red onion adds a nice crunch and a slight kick. The toasted pine nuts give a nutty flavor and a delightful crunch. Together, these ingredients make the salad more exciting and full of flavor.
Greens and Seasoning
– 1 cup arugula or mixed greens
– Salt and pepper
– Fresh basil leaves for garnish
For the greens, I like arugula or mixed greens. They provide a fresh base for the salad. Seasoning with salt and pepper enhances all the flavors. Finally, fresh basil leaves for garnish offer a lovely aroma and a pop of color. They make the dish look special and inviting.

Step-by-Step Instructions
Preparation Steps
– First, take a large mixing bowl.
– Combine 2 cups of shredded chicken, 1 cup of mayonnaise, and 1/2 cup of basil pesto.
– Mix them well. Make sure the chicken is coated evenly.
– Next, add 1/2 cup of halved cherry tomatoes, 1/4 cup of finely chopped red onion, and 1/4 cup of toasted pine nuts.
– Gently fold these ingredients into the chicken mixture for a colorful salad.
Seasoning and Assembly
– Now, season your salad with salt and pepper. Adjust it to your taste.
– In a serving dish, place a bed of 1 cup of arugula or mixed greens.
– Spoon the creamy pesto chicken mixture generously over the greens.
Presentation
– For a bright touch, garnish your salad with fresh basil leaves.
– You can serve it in a large bowl or portion it into mason jars.
– Drizzle a bit of extra pesto on top for added color and flavor.
Tips & Tricks
Customizing the Salad
You can easily swap mayonnaise for Greek yogurt. It gives a creamy texture and cuts fat. If you want a lighter feel, try avocado instead. You can also add other vegetables. Chopped bell peppers or cucumbers bring crunch and color. Spinach can replace arugula for a milder taste.
Optimal Mixing Techniques
When mixing, use a large bowl. Start by blending the chicken, mayonnaise, and pesto. Mix until the chicken is coated well. Then, add your veggies. Use a gentle folding motion. This helps keep the ingredients intact. It also ensures every bite has a bit of everything.
Flavor Enhancements
For extra flavor, add lemon juice or zest. It brightens the dish and adds freshness. You can also sprinkle in garlic powder or crushed red pepper for spice. When choosing pesto, fresh is best. It often tastes richer than store-bought. However, store-bought can save time and still taste great.
Pro Tips
- Use Fresh Ingredients: Opt for fresh basil and ripe cherry tomatoes to enhance the flavor of your salad.
- Customize Your Greens: Feel free to mix and match your greens; spinach, kale, or romaine can all add unique flavors and textures.
- Make It Ahead: Prepare the chicken salad a day in advance; the flavors meld beautifully when refrigerated overnight.
- Perfect Portioning: For meal prep, consider using mason jars to layer the ingredients; this keeps the salad fresh and portable.
Variations
Protein Alternatives
You can switch up the protein in your creamy pesto chicken salad. Using rotisserie chicken is a great choice. It saves time and adds flavor. Just shred it and mix it in.
If you want a vegetarian option, try tofu. Use firm tofu for the best texture. Press it to remove extra water, then cube it. Toss it in with the other ingredients for a tasty twist.
Flavor Variations
Adding different herbs or spices can change the whole dish. Try mixing in fresh dill or chives. These herbs bring a bright flavor. You can also add a pinch of red pepper flakes for heat.
Incorporating cheese is another fun option. Feta or goat cheese crumbles add creaminess and tang. Just sprinkle some on top or mix it in with the salad.
Presentation Variations
How you serve the salad can make it more fun. You can use mason jars for a cute, portable meal. Layer the greens at the bottom and add the chicken on top. This way, it looks great and is easy to take along.
For a classic look, serve it in a large salad bowl. Top it with extra pesto for a pop of color. You can also garnish with fresh basil leaves for a nice touch.
Storage Info
Refrigeration Tips
Store your creamy pesto chicken salad in an airtight container. Glass or BPA-free plastic works best. This helps keep it fresh and safe. The salad stays fresh for about three days in the fridge. If you notice any changes in smell or color, it’s best to toss it.
Freezing Options
You can freeze this salad, but it may change texture. If you choose to freeze it, use a freezer-safe container. It can last up to two months. When you’re ready to eat, thaw it overnight in the fridge. To reheat, avoid using a microwave. Instead, let it sit at room temperature for a bit, then enjoy it cold.
Meal Prep Ideas
Preparing this salad in advance is a great time-saver. You can make it on the weekend and enjoy it throughout the week. For portion control, divide it into single servings in mason jars. This way, you have quick meals ready to go. Just add greens right before eating to keep them fresh.
FAQs
What is the best way to cook chicken for this salad?
The best way to cook chicken for this salad is to grill or poach it.
– Grilling: This method gives the chicken a nice char and smoky flavor. Cook it over medium heat for about 6-8 minutes per side, or until the chicken reaches an internal temperature of 165°F.
– Poaching: This method keeps the chicken moist and tender. Place chicken breasts in a pot of simmering water or broth. Cook for about 15-20 minutes, or until fully cooked.
Both methods work well and keep the chicken juicy for the salad.
Can I make this salad ahead of time?
Yes, you can make this salad ahead of time!
– Storage: Store it in an airtight container in the fridge. This keeps it fresh and tasty.
– Timing: It’s best to eat the salad within 3 days. If you add greens, wait to mix them in until just before serving. This keeps the greens crisp.
What can I substitute for basil pesto?
If you don’t have basil pesto, there are great substitutes.
– Sun-dried tomato pesto: This offers a rich, tangy flavor.
– Arugula or spinach pesto: These greens make a nice twist.
– Greek yogurt with herbs: This adds creaminess and a fresh taste.
These options give you variety while keeping the salad delicious!
This blog post covered a tasty chicken salad recipe. We discussed key ingredients, such as cooked chicken, mayo, and pesto. You learned how to prepare and season the salad, with tips for customizing and enhancing flavors. Variations allow for protein swaps and creative presentations. Remember to store your salad properly for the best freshness. With these steps and ideas, you can enjoy a simple and delicious meal. Experiment and have fun making it your ow